Sunday, January 24, 2010

Painted and Screened Photo Albums


I have so much fun making my painted paper that I wanted to find more ways to use it! I decided to cover these small photo albums which are very good for recipes or to keep a photo journal of your art work to take along with you on shows. Cyndie Smith, a wonderful metalsmith who makes beautiful jewelry ( see her shop at: http://www.etsy.com/shop/cyndiesmithdesigns) recently bought one of my photo albums to take with her to one of her shows!

I layer the paint using stencils, splatters, and silkscreen designs and try to create rich vibrant colors and designs. I use large sheets of paper and then cut out the sections that I want to use to cover my journals, photo albums, and file organizers. The smaller pieces are used for making my mini cards and I love the results (see these items at: http://www.etsy.com/view_listing.php?listing_id=39217079) .

Thursday, November 19, 2009

Hand Painted Card/Bill Organizer and Journal


It has been a while since I posted anything new! I am currently focusing more on my hand painted journals and bill organizers lately (because I am having fun!) I am mulling around some ornament ideas but for some reason this has not quite taken hold of my fancy as of yet and if it doesn't soon, the holidays will be over! Anyway I am posting a couple of my favorite journal and card holders that I have recently created! They are matching because I used the left over paper from the bill organizer to cover the journal.

Monday, September 28, 2009

Story Behind my business card holders!


The design for my cards holders came about by complete accident. A few years ago one of my neighbors was throwing out a stained glass lamp shade that had white and pink glass pieces. I fished it out of the trash and diligently took it apart and was left with eight wide petal shape pieces (the back), 8 trapezoid shapes (the bottom), and 8 or so long petal shapes (which I used for the sides). I began playing around with the pieces wondering what I could make and stumbled upon the idea of the card holder. The pieces lent themselves perfectly, with only one cut on the sides (and I am all about less work). Of course now all the pink and white pieces are long gone and I have to cut all the pieces but I still enjoy making these card holders!

The picture of the pink holder is one of my original holders that sold long ago. I keep trying to improve my holders each time I make one and have changed the front shape but have stuck with the original overall pattern because it works so perfectly! I have made and sold about 30 card holders over the years and have had many satisfied customers!

Now for my new card holders, I pick out glass that is unusual and cut the pieces to take advantage of the most beautiful aspects of the glass. My favorite part is finding shapes and beads to adorn the holders. The Orange Mint holder is one of my new favorites!

Saturday, August 29, 2009

Creating Digital Artwork- Photoshop Possibilities


I haven't had the courage to post any of my digital art but if anyone out there in etherland has any interest, I will make my debut today! It all starts with a photo which is uploaded into Photoshop! I don't know more than about 20% of the capabilities that photoshop offers but it is fairly easy to navigate through the Filter Gallery and find renderings that are artistically pleasing.

If you are not familier with this, go to your header and click on "Filter". I personally like using the "poster edges" feature first (which is in the "artstic" category), followed by "paint daubs" or "dry brush" (also in "artistic" heading). It allows you to keep the outline of your picture but gives you a painted feel.

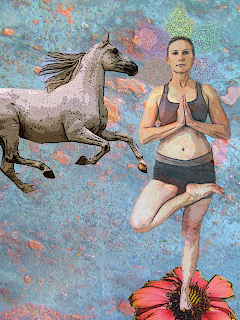
For the yoga picture, I created the background from a photograph of Travertine tile. I clicked on "Image", then "adjustments" and then used the "Hue Saturation" button to increase the color saturation to bring out lots of hues. That created my background.

Then I used the "Poster edges" feature in the "filter" for the two separate pictures of the horse and myself doing the yoga posture. After I got the horse and yoga posture the way I wanted ( also using the hue saturation feature), I used the magnetic lasso to outline the horse/posture, used the "Edit" then "copy" and then "paste" to get the two pictures on my travertine background. Since the horse and yoga posture are separate layers, you can move them around separately untill you find a good spot using the move tool. I like to keep the layers separate untill I am completely done. That way you can edit each layer separately. I repeated the process for the flower and the design around my head. If you want a design to overlap another design, simply drag the layer down below the other layer. To show the layers, simply go to "Window" and click on "layers" and the layer window will display on your screen. Once you are sure of your completed design, click on "layer" and scroll down to "Merge layers" and all the layers will merge. Now you can edit the picture as a whole (using the filter) if you want to continue to render your desing.

Hopefully, this is not too confusing for the beginner using Photoshop!

Wednesday, August 26, 2009

For the love of Yoga!


Poor little neglected blog! I decided to change the subject today and talk about Bikram yoga. For those of you who are not familiar with Bikram, it is basically Hatha yoga in a very, very hot room (105 degrees). I have been practicing this yoga for the last five years and do attribute a lot of my refound interest in stained glass and creative flow to having been practicing this yoga. The heat is intended to get your heart pumping faster and sweating out all the toxins (my body must be extremely pure..time to fill it up with more poisons!)

I actually started doing stained glass many, many years ago but when I got into the Bikram yoga I was first inspired to create stained glass yoga postures (like this one pictured). I have since moved on to the plant stakes as seen on my etsy site (but will occasionally re-create a yoga posture upon request)!! Namaste

Monday, July 20, 2009

Designing Stained Glass Patterns- Part IV

FINISHED! I decided to put some pink pearls for more interest and also especially bought the jade beads for more accent. I really like the way it turned out!

Saturday, July 18, 2009

Designing Stained Glass Patterns- Part III


This first photo shows the glass completely cut out and ready to wrap with copper foil. I had to adjust the design again because I miscut the largest piece of aqua glass. What I do is trace the edge of the glass to create new lines which will be the edge of the next piece( this works as long as I have not already cut the next piece) .

The next photo shows the piece soldered together and I am deciding where to place the wire leaves.